|
|
|
|||
Carb Up!
|
||||
|
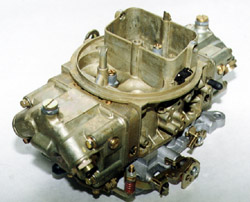
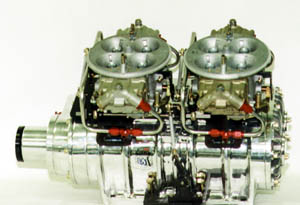
Generally race engine shops are loathe to let a magazine show their speed secrets much less give the readers directions on how to do what they sell. Oddy/Perfection Race Engines in Sarasota, FL is not the normal speed shop, though. Their specialty is building turnkey gas burning supercharged engines. But they do a lot more than just build complete supercharged engines, they also build, assemble, and modify many of the components used to build one of their engines. One of their specialties is modifying Holley carburetors for use on gas burning blower motors. On a recent visit to their state of the art shop they agreed to show DRO and our readers the basics of modifying a carb for supercharger applications.
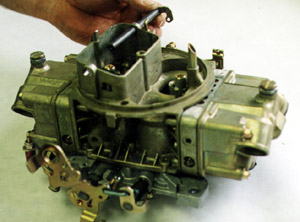
Since the assumption is that this carburetor is going to be used for mostly racing applications and you shouldn’t be worried about starting the engine in really cold weather, the first step is to remove the choke blade. This can be done with a pair of needle nose pliers or whatever pliers you have on hand. A good yank will get the job done. Removing the choke flapper helps increase airflow through the rear barrels. At the same time take the shaft out of the air horn. Once the choke blade and shaft are gone take the choke control assembly off of the carb. You won’t need that anymore. A screwdriver and your trusty needle nose will get this part of the job done. There is another step here involving the use of a cutting wheel but unless you are sure you are never going to put the carb back to stock condition it’s probably best to skip that part. You should also plug up the hole that the choke shaft comes through with silicon or something similar.
One of the things that Oddy/Perfection does is to put a rubber type bowl gasket on so that when you are constantly taking the bowl off and on to change jets you won’t have to keep replacing the gasket.
Oddy/Perfection Race Engines
photos by Jeff Burk
|
||||
|
Copyright 1999, Drag Racing Online and Racing Net Source |
||||
 It’s a well-
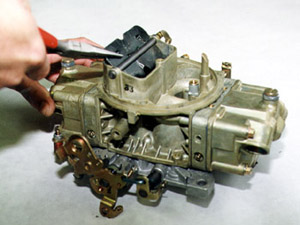

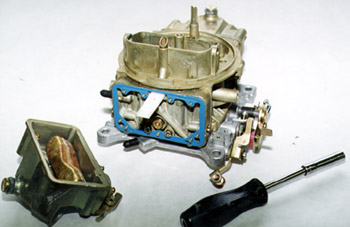 OK,
now that you’ve got the carb cleaned up externally it’s
time to make some changes internally. For this you’re going to
need a nut driver and a common screwdriver. Remove the float bowl,
the power valve and the main jets. You are generally going to have
to replace these with bigger jets and power valves. Just how big is
going to depend on the size of your engine, blower overdrive, and
whether you are burning pump gas or racing gas. If you’re going
to do your own work you have to expect to do your own R&D.
OK,
now that you’ve got the carb cleaned up externally it’s
time to make some changes internally. For this you’re going to
need a nut driver and a common screwdriver. Remove the float bowl,
the power valve and the main jets. You are generally going to have
to replace these with bigger jets and power valves. Just how big is
going to depend on the size of your engine, blower overdrive, and
whether you are burning pump gas or racing gas. If you’re going
to do your own work you have to expect to do your own R&D.
 The
squirters will probably have to be changed but again what size to
use will depend on the application and your testing. Once you have
finished the work the carb is a much cleaner, simpler, and lighter
weight unit than the stock carb, but it is definitely not a real street
friendly piece anymore. It is, however, something that you can do
yourself in your garage with a minimal of tools and time. However,
if you want to get a bolt-on unit that has been specifically set up
for a specific supercharged engine combination then you might be better
off to order a dyno tested version from Oddy/Perfection and save yourself
some grief.
The
squirters will probably have to be changed but again what size to
use will depend on the application and your testing. Once you have
finished the work the carb is a much cleaner, simpler, and lighter
weight unit than the stock carb, but it is definitely not a real street
friendly piece anymore. It is, however, something that you can do
yourself in your garage with a minimal of tools and time. However,
if you want to get a bolt-on unit that has been specifically set up
for a specific supercharged engine combination then you might be better
off to order a dyno tested version from Oddy/Perfection and save yourself
some grief.