 |
|
|
So the first thing I did was call up my buddy Wayne Scraba in British Columbia, a chap who was an ex-Royal Canadian Mounted Police turned racer and an all-around automotive whiz, and told him I wanted him to do a monthly column on tech stuff. "Let's call it something catchy, like 'Quik Trix,' something an average bracket racer can read and learn something about in 10 minutes max," I said. "Make it two pages long, you supply the photos unless a manufacturer gives you some." Scraba now contributes tech to DRO.
Those two-page, quick-read "Quik Trix" lasted for 68 issues of Bracket Racing USA, and they were my favorite part of the book. Bracket Racing USA was killed in 1999 or so when the company was sold to a corporation in California that came up with Drag Racing USA, which was also killed a couple of years later. But I always thought that "Quik Trix," or "Pit Tips" or any derivation of the same was a great idea. Still do.
In that spirit, I'm going to give you-all five all-new "Quik Trix" that I've recently gleaned from our hours building our new front-engine dragster, and working on wife Fran's '89 Suncoast rear-engine dragster. More may come later on in the year, but for now, read 'em and learn. If you have some yourself, feel free to let me know about them. I figure any ol' racer can learn a few new tricks -- um, make that "Trix."
CAP IT OFF
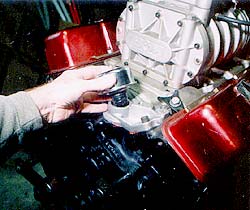
I have had my small-block Chevy engine sitting on the engine stand and ready to go into my new Tommy Harris/Fabrication Concepts-built front-engine dragster for nearly two years now. It is sitting there, less carburetor and headers and protected by a plastic wrap that came from my local machine shop after all the machine work was done. It hasn't moved since.
It is also somewhat dusty down there in my basement, and that's the reason for the plastic wrap. But since the MSD 8555 distributor is not mounted on the back of the motor, the distributor hole is open, providing a good opportunity for dust to settle in when the plastic wrap is not on the engine.
 Recently,
I changed oil pans on the engine, removing the wrap for a couple of days. The
white masking tape that I affixed over the distributor hole had almost disintegrated
by then, so I had to come up with something to cover the hole and keep all the
dust out. Poking around, I found that a Chevy valve cover breather with a rubber
grommet attached fit nicely into the hole, doing away with the crumbly masking
tape and the potential for trash and dust to get inside the motor. Try this
yourself. Just don't expect the breather to stay in place if you have to turn
the engine upside down on the engine stand.
OH, 'CHUTE!
Mounting a parachute on any car is time-consuming and carries a potential for disaster. You have to be awfully careful in putting this item on your door car, dragster or roadster, because your life is literally in your own hands when doing so. It has to be done right.
First, some advice about a parachute. No. 1, don't even think of buying a used one. Again, it's your life, and how much is it worth? Say, $50 for a flea market used one, or $300 for a new, never-used one? My life is worth much more than that, and I gladly paid the proper dough for our new Stroud Safety 'chute.
No. 2, follow all instructions that come with your new parachute. And No. 3, if you're in doubt, find yourself a friend like we found in James Webb, a Top Dragster racer from Acworth, Georgia, who was over at Tommy Harris's FabCon shop when wife Fran and I were about to mount our Stroud on the back of my new front-engine dragster.
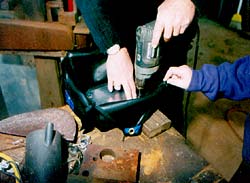
 Mounting
the parachute involves drilling four holes into the small aluminum mounting
plate that came with our Stroud parachute, and Webb showed us the proper way.
First, he found dead center, penciled it in, then measured from there to line
everything up with the four bolt holes in the round stock that will serve to
hold our parachute in place on the back of the dragster's roll cage. Drilling
of those four holes through the aluminum mount was no problem once we determined
exactly where they should go.
But what about the four holes needed for the cloth parachute pack itself? Do we use a knife and dig them out, or use the same drill and bit for the aluminum holes and drill the pack with that? Neither, Webb said. Take the parachute pack, and once you've determined exactly where the four holes are going in it, place the pack on a block of wood and drill away. "Drill all the way through the pack and into the wood," Webb said. "That way you won't have any frayed edges in the chute pack, and it will last nearly forever." We let him do the drilling on our Stroud, and the results turned out nice and safe.
BG'S NEW IDLE-EZE MATCHES CAM TO CARB
High-performance camshafts and carburetors sometimes don't get along. Install a high-lift or long-duration cam in your engine and your carburetor idle often goes to the dogs, with engine rpm either way too high for proper starting line staging or
|
ADVERTISEMENT  |
Valve overlap is the culprit here. In many racing cams, intake and exhaust valves are open simultaneously, and that leads to different pressures above and below the carburetor butterflies. The carb's "idle signal" becomes lost, and idling and responsiveness suffer. The carburetor is being deprived of engine vacuum, and no amount of idle screw adjustment can solve that problem.
The solution has often been to drill holes in the carb's butterflies, which allowed the natural atmospheric pressure above the butterflies to effectively solve the problem. But now, you say, that doesn't seem right. After all, your argument might go, I just paid "X" number of dollars for this new carburetor, so why should I drill a bunch of holes in its bottom when I haven't even bolted it onto my engine yet? And how big a hole? And exactly where? Many a carburetor has been rendered useless by the wrong size drilling.
Barry Grant has come up with a solution to the no-idle blues. The company, started by bracket racer-turned-Pro Stock racer Barry Grant, has just introduced its Demon Carburetion Idle-Eze, that comes on every new Mighty and Speed Demon carburetor shipped out of its giant, two-building headquarters. It is a spring-loaded, needle-valve and brass seat assembly located in a thread hole in the center of he base plate that is designed to precisely meter an additional source of air to the intake plenum. It does so via four milled channels on the top of the baseplate and another four on the bottom.
| Source |
| Barry Grant Fuel Systems 1450 McDonald Rd. Dahlonega, GA 30533 (706) 864-8544 |
After setting the butterflies in their correct idle position, any necessary adjustments to the Idle-Eze can be made by a screwdriver through the air cleaner stud hole. It also allows for smoother transition from off-idle, and eliminates carb hesitation.
MIRROR, MIRROR ON THE ROLL CAGE
Don't laugh, but I'm gonna put some mirrors on my new dragster. Already, chassis man Tommy Harris of Fabrication Concepts in Douglasville, Georgia has welded and drilled two tabs on my car, right below the bottom where the roll cage meets the main top part of the chassis. A friend of mine, Dave Hamilton, gave me two mirrors off his Malibu wagon when I had a similar wagon, and I've always kept them around, figuring they could be put to good use.
There was one problem, however. Dave gave me two left-hand mirrors, and I'll be dogged if I can find a right-hand one. Dave said he thought the mirrors were off either a '70s-'80s Malibu or El Camino, so one recent Saturday, wife Fran and myself went junk-yardin', looking for the right-hand side. No luck. I have come to the conclusion that those cars didn't have right-hand mirrors, so our junkyard hunt was in vain.
Then viola! I thought of Killer Creek Harley just down the road from our Alpharetta, Georgia, home. We stopped by, scoped out mirrors that go on Harley motorcycles, and I bought two. Now we have to adapt them to Harris's two brackets, but I think they will work.

Why 'Don't laugh'? Not very many people race dragsters with mirrors, but I have to ask, 'Why not?' Fran and I have always raced with mirrors on our door cars, and they have proven their worth in many ways -- from backing up after a burnout to spotting our opponent on the top end. And dragsters? If I remember right, both "Big Daddy" Don Garlits and Shirley Muldowney have raced with mirrors on their fuelers, and if it's good enough for them, it's good enough for me.
I once won an easy race in my ex-Super Gas Datsun by watching my faster opponent go up in smoke just after he left the starting line. My left-hand mirror saved the day.
Think about it. Then go junk-yardin' or motorcycle shop hoppin' and see what you can come up with. A good mirror could save YOU a round or two.
 HEY,
THERE'S AN MSD UNDER MY SEAT!
Again, let's visit my front-engine dragster for a quick Pit Tip. I credit chassis man Harris with this idea.
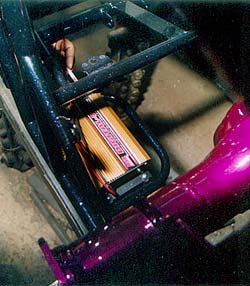
We were searching for just the perfect place to mount our new MSD Digital 7-Plus
ignition box, a box that is about as wide and as long as a folded piece of paper.
Now, this is one trick piece. According to MSD's media relations man, Todd Ryden,
the box is outfitted with rotary dials, making it easy to set various rpm controls
either by a turn of the screwdriver or a twist of your fingers. The MSD Digital
7-Plus has two rev limiters -- a low side, for starting line launches and a
high side, for over-rev engine protection -- that can be set at hundred-rpm
increments. There is also a built-in stage of retard, for single-stage nitrous
shot applications, and a retard for starting, Ryden said.
| Because the MSD Digital 7-Plus is so small, we decided to mount it under the seat in the dragster. That way, it is kept out of the elements, and any rpm setting that I want to employ can be easily reached by a small screwdriver. I don't see why ANY dragster, front- or rear-engined, can't be outfitted with the Digital 7-Plus in a similar manner. |
|
Copyright 1999-2004, Drag Racing Online and Racing Net Source