|

Part 2
5/7/04
 Last
issue, we took a look at the some of the hardware
used to install an Auto Meter Data Logger in
a contemporary racecar (in this case, a NHRA
SS/GT Firebird). In that issue, we showed you
some of the hardware (sensors, etc) required
for the hookup. What follows is a continuation
of the hook up process along with a series of
installation tips and tricks from the folks
at Auto Meter. Last
issue, we took a look at the some of the hardware
used to install an Auto Meter Data Logger in
a contemporary racecar (in this case, a NHRA
SS/GT Firebird). In that issue, we showed you
some of the hardware (sensors, etc) required
for the hookup. What follows is a continuation
of the hook up process along with a series of
installation tips and tricks from the folks
at Auto Meter.
Installation Tips & Tricks ...
 Auto
Meter is gaining a large following in the world
of data logging devices. One of the reasons
is that they offer hands-on installation tips
and make the effort to service racer needs at
the track. We've included a series of general
installation tips from Auto Meter. There's nothing
tricky here folks, but keep in mind a Data Logger
is a sophisticated electronic device. You can't
install one with a crescent wrench and claw
hammer. Auto
Meter is gaining a large following in the world
of data logging devices. One of the reasons
is that they offer hands-on installation tips
and make the effort to service racer needs at
the track. We've included a series of general
installation tips from Auto Meter. There's nothing
tricky here folks, but keep in mind a Data Logger
is a sophisticated electronic device. You can't
install one with a crescent wrench and claw
hammer.

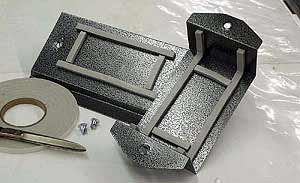
During the installation, one of the first
things you have to do is fabricate a mount
for the actual computer. This is a sheet
metal mount fabricated for an installation.
Since the car is a typical sportsman application,
it doesn't have a magneto. This means that
special shielding in the mount is unnecessary.
As per the Auto Meter tech tips shown elsewhere
in this column, weather-strip is used to
isolate the computer from vibration. |
1.The computer
can be mounted at any angle in the vehicle and
should be supported by foam rubber or weather
stripping. When properly installed, you should
be able to move the unit 1/8" to 1/4" in any
direction with one finger.
2. The cables included
with the system are interchangeable except the
remote start switch. Each cable is labeled for
a specific function. The system is designed
to survive an accidental misconnection for a
short period of time. Damage may occur from
prolonged misconnections.

|