| 
As is my normal procedure I decided to check the crankshaft
endplay before removing the crank and cam. When I inserted
the pry bar between the number 2 main cap and the crankshaft
and gently pried to move the crank my mind about exploded.
“Holy cow, that main cap moved A LOT!“ Sure enough,
if I looked real close I could see a crack in the block. I
removed the caps, crankshaft, and cam. Upon further inspection
the only part of the block main saddle that was actually attached
was about an inch long on one side in the area that has the
main oil galley passage. That is why I still had oil pressure
last fall.
ADVERTISEMENT
 |
Once
I grasped the reality that the block was junk, I took a small
ball-peen hammer and gave the main web a couple of “love
taps” and a pie-shaped piece of the block literally
popped straight up out of the block! Man did I get lucky!
This bad boy wannabe was about half a burnout from having
a serious oil pan failure! From what I can surmise the block
and spindly crankshaft had flexed enough to let the CP Pistons
cock in the bores and rub the rings to an early demise. But
hey, I’m not complaining. It could have been a WHOLE
LOT worse! Luckily the rotating assembly was saved and the
pistons weren’t hurt so a new block was in order.
What to use for a block was the next question. I had read
other articles over the years about the weakness of the late
302 roller blocks and how some of them actually break in half
when you reach the 450 to 500 hp level but I never figured
on having a problem. I do remember however in one of my first
articles covering this potential problem and saying “hope
for the best.” Oops. The initial plan was to build a
bigger engine but time was fleeting and I really wanted to
race this year. The hopes for chasing the IHRA Division 5
points had been dashed a couple months earlier when IHRA corn-holed
all of the people who had supported them in this area when
they decided not to have a Division 5 anymore. Brilliant.
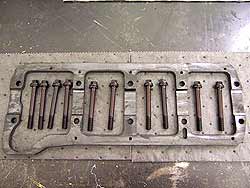
The Moroso main cap girdle in
all it’s glory. Simple and highly effective this
little gem will hopefully keep the Hemi-eater in one piece!
|
So, I went a different route. I had another 302 HO block
that already had the water jackets filled and only needed
bored out to .060” overbore to fill the role. Considering
I didn’t want to build another ticking time bomb, I
needed a way to add strength to the block.
That’s where my friends at Moroso come in. Man I swear,
if I need it Moroso more often than not has it. Moroso has
recently come out with a Main Cap Girdle for small block Fords
(part # 22928) made out of ½” chrome moly steel
that simply bolts to the main caps with the included fasteners,
and as usual for Moroso it actually fits! The included locating
washers actually tie the girdle into the main caps making
a cohesive unit with the new bolts and make for a much more
rigid bottom end. I think, and hope, this will end the bottom
end problem.
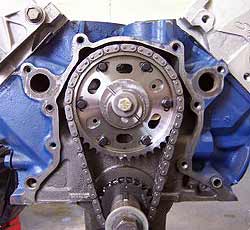
This is the Comp Cams Ultimate
Timing set. The six black bolts are the retention for
the two pieces of the sprocket. Simply loosen the bolts,
turn the outer gear to specs. and you have changed cam
timing! Nice! |
After fitting in new Durabond Teflon coated cam bearings
and file fitting new rings I installed the same Comp Cams
hydraulic roller stick I used last season and installed the
stock Ford crank, I-beam rods, and CP Pistons from before.
The only gear train change was a switch to Comp Cams new Ultimate
Adjustable timing chain set (part # 8138). This is a really
tricky piece of hardware that allows very easy and accurate
adjustability of cam timing. Basically, the cam gear is a
2-piece unit that rotates within itself using a provided adjustment
tool and all you do is line up the marks for whatever advance
or retard position you desire. One neat feature is you don’t
have to back of the rockers to allow movement because the
inner part is attached to the cam and the outer will rotate
with the crank when you loosen the holdown fasteners. Once
you're set, simply tighten the ARP bolts and away you go!

|